Search This Blog

Tuesday, August 28, 2012

Basil Jelly


Basil jelly, I knew as soon as I read the words I had to try it, especially since my basil plant is the size of a small tree! I did a search and found several recipes. Some were REALLY basic and seemed like they would be a bit blah, others too complicated and overdone. I decided to mix and match from several recipes and here's what I came up with:
  • 4 cups water
  • 2 cups firmly packed fresh basil leaves, finely chopped
  • Squeeze fresh lemon juice
  • 2 drops green food coloring, optional
  • 3 1/2 cups sugar
  • 2 tablespoons rice vinegar
  • Pinch of salt
  • 3 ounces liquid pectin ***

Start by chopping the basil, I used my food processor, until coarse. 


Bring basil and water to a boil. Remove from heat, add squeeze of lemon, cover and let stand for 10 minutes. Strain out leaves and ladle 2 cups of strained liquid into separate saucepan. 


Add the vinegar, salt and sugar and bring to a hard boil, stirring. When the boil can't be stirred down, add the pectin and food coloring. Return to a hard boil and boil for 1 minute then remove saucepan from heat.

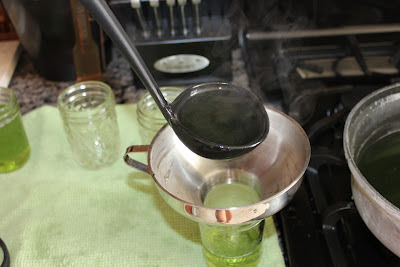
Skim off the foam and ladle the jelly into five hot, sterilized (sterilized in boiling water for 10 minutes) half-pint jelly jars. Leave ½-inch (or less) headspace and seal at once with sterilized 2-piece lids. Place in boiling water bath for 5 minutes.


***Ok, so I finished my jelly and tucked it away to set up... only it didn't. It's super liquidy which leads me to the conclusion that 3oz of pectin is not enough. I'm going to experiment and add more pectin until I get the desired consistency. I'm also going to adding in a little more lemon juice to up the acidity, as that may be part of the problem. Will let you know how it tastes as soon as I get the finished product! If anyone tries this and gets the right combo, please share!! XOXO


Saturday, August 18, 2012

Ombre (gradient) Nails


So lately, I've been a little (A LOT) obsessed with Pinterest, I keep finding myself drooling over re-furbished dressers, kitchens I could only design in my HGTV dreams, and craft projects that make me feel lazy because I'm on my laptop and not actually creating ANYTHING! Along with all the "I'll never do that in a thousand years" pins, sometimes something comes up that I actually attempt! And so it was with the ombre nail. Ombre is the latest "it" thing, I mean it's everywhere, clothes, hair, decor, everywhere. I'm into it, I like it, dig it, want it NOW. So, when an innocent afternoon of pinning turned up THIS BEAUTY, I had to try it for myself. Let's just say I've never been "gifted" in doing my own manicures but for the sake of taking on another project, I decided to give it a go!

I was actually pleasantly surprised with the process. It's not that difficult to achieve the gradient goodness! Here we go:

Start by buffing and shaping your nails and removing cuticles.


Next, pick your colors. I decided to go with pink and white. I like the look of a French manicure but it's soooo 2006 but the ombre French manicure on the other hand, is like it's sexy, updated cousin.

 
Take a makeup sponge and dip it in water, then squeeze out most of the moisture. Next, paint the tip of the sponge with your colors and blot on a plastic baggy. Line up the end of the sponge with your nail bed and dab the sponge up and down in the same place until the color transfers. It's going to be very light at first but let your coats dry before applying the next.


Your fingers are going to get very messy during this process. As you'll see a little later, you can use scotch tape to help the cleanup process. Don't worry, just use a brush and some acetone polish remover and you'll be good to go.


After I cleaned off the excess polish from my cuticles (I discovered you can NOT take pictures of yourself while doing this) the last thing you do is add a clear top coat.


Voila! The finished look, an ombre French manicure!


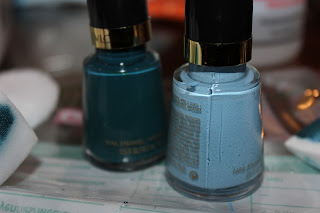
 About four hours later, I decided I wanted to do another look, something a little more funky. I asked Mr. B to pick out some colors for me and this is what we went with. Two lovely blueish hues! 


This time I wised up and covered my cuticles in scotch tape. This totally helped with the cleanup!


Hey look, Mr. B is home and helping me take pictures so you can actually see the steps!!! I tried a different approach this time, I painted the colors right on the bag and then pressed the sponge into the paint.


Here's the application, just press and re-press until it transfers!


Tape removed, SO much better! Took half the time to clean.


And here it is!!! I'm also artfully holding this pretty mosaic glass ball for dramatic effect. Sheesh, the things I do for you people, LOL. I definitely need to practice this a few more times to perfect my techniques but hey, not bad for the first go round! 


Monday, August 6, 2012

Making Liquid Soap From a Bar

Hellooooo friends, long time no post!!! Mr. B and I have been roaming the country having some pretty great summer adventures. In the last six weeks we've been to South Dakota, Key West, Las Vegas, and W. Virginia... I'm exhausted :/ But now we're back and I'm excited to catch up on some "taking on"!!! 

I saw a pin on Pinterest a few months ago for making liquid soap from a bar. I love this idea. I am simply ob-seeeeesssssed with Mrs. Meyer's Clean Day Lavender soap. It all began when I visited my dear friend, Mrs. V, in San Francisco this spring and saw the unassuming soap dispenser sitting on her bathroom counter. The minute that fresh, lavendery smell came wafting up through the bubbles, I was hooked. It's like a love affair with a scent. But as obsessed as I am with the soap, I am not quite as obsessed with its obscene price tag. I mean really, you want me to pay over $6 for hand soap?!? Ok, so I do but I don't like it one bit! When I saw this post it really piqued my interest, since you can buy a bar of Mrs. Meyers for around $4 and the recipe says it yields a WHOLE GALLON of soap :D YAAAY for me and my olfactory system!!! The recipe is pretty basic:

What you need
  • Cheese grater
  • 8oz bar of soap (I used a 4oz bar and the scent wasn't as strong as I would have liked for it to be)
  • 2 tablespoons liquid glycerin (Here's a fun fact, I checked FOUR, count 'em four, stores for liquid glycerin and nada... save yourself some time and order it online!!!)
  • 1 gallon distilled water
Step 1: Grate your bar of soap
 Step 2: Add grated soap to gallon of distilled water

 Step 3: Stir over medium heat until soap melts.

 Step 4: Add glycerin to mixture.
Step 5: Let sit for 10-12 hours
 Step 6: Stir soap, if it's too thick use a hand mixer and a little bit of water to reach the desired soapy consistency!

Funnel the soap back into the distilled water container and voila you have a WHOLE GALLON of your favorite suds :)

Personalize your soap scents by adding perfume or essential oils! You can also buy fun little dispensers and create your own soaps for party favors or Holiday gifts.