The first big task was to paint the nursery. I know what you're thinking, girly equals pink, but not always. I like pink but I also didn't want BB to be engulfed in it. I want her nursery to be bright, and cheery, and romantic. I also want it to have a sophisticated feel. Maybe that's ambitious for a newborn's room but I don't care. Considering I'm going to be spending LONG hours in this space, I don't want it to look like Chuck E. Cheese's house. I'm not into cartoons and "baby" looking stuff and let's face it, until she's asking me for it, she isn't either! Haha, I kid (not really).
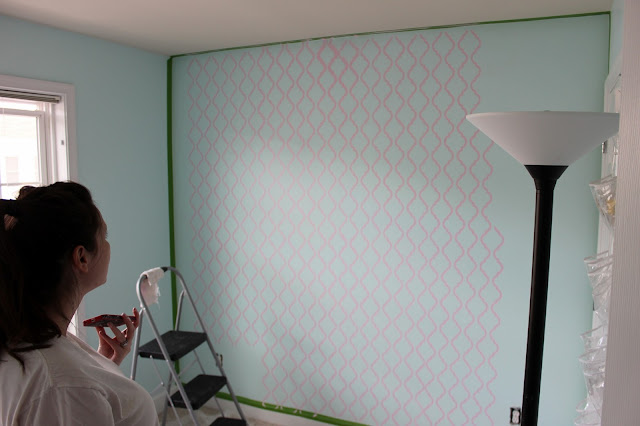
I think the nursery should be inline with the rest of your home, a softer extension of your style, if you will. I considered pink walls but it just didn't fit the vision I had. What did fit that vision was light, turquoise-y blue with an accent wall. After the all over color started going up, I kind of panicked. It did not look girly at all. It was a blue room. I took a breath and reminded myself that once finished, her nursery would be undeniably feminine. I kept painting. I chose a Moroccan-style stencil and a gorgeous soft pink paint to give visual interest to the room along with the feminine touch I was looking for.
First of all let me say, stenciling is NO JOKE. It's hard. It makes you want to throw in the towel and re-paint the entire wall. That is, until you get the hang of it, then it's still annoying but totally doable.
So, without further ado, here's what I learned:
- Prep well. The last thing you want to have to do is stop to find a step ladder or get a wet washcloth mid-project.
 |
| The wall pre-stencil. |
- Follow the directions. No duh, right? Well, I know a few folks out there (ahem, me) who like to jump in and "wing it". Don't wing it, take five minutes to read the directions, your free time will thank you.
- Start in the middle of the wall and work your way to the corners. Once you're done with everything else, you can trim your stencils to more easily fit the hard spots but DON'T do that until everywhere else is done!
- Use spray adhesive on the stencil. I used 3M spray and it was the perfect helper to keep your sanity and the stencil in place. Also, use a few pieces of tape for extra hold.
 |
| Man, can I ROCK Mr. B's t-shirt, or what? At least he spared you a shot of the boxers I was also wearing ;) |
- Use the right tools. I found that a small sponge applicator worked way better for me than the stencil brush in tight spots. Also, use a dense foam roller, it makes a difference!
- Keep your base paint handy for any touch ups. If you screw up, don't freak out, just paint over and try again.
 |
| Pregnant lady on a step ladder AND painting??? Everyone panic! |
- Take breaks. Or don't and be prepared to go to sleep seeing the pattern repeating behind your closed eyelids.
 |
| Mrs. B Taking a Break |
- Clean your stencil. Once it starts getting gunked up, time to take a break. Soak it in the tub for 10 minutes and if you're using latex paint, it will peel off super easy and give you a fresh surface to stencil on again.
- Wear socks. I started out barefoot and between the paint, plastic and spray adhesive, my feet were ooey-gooey in no time. Socks make for quick clean up!
 |
| I don't have a picture of my socks... here's another "action" shot |
- Take the time to do the edges. You won't want to. Do it anyways.
- When you finish, STOP. Resist the urge to scan every inch of the wall for "touch up" areas. This will not only make you crazy but in the grand scheme of things, no one is going to see the tiny imperfections except you.
- Last but not least, it's totally worth it. Even though it is time consuming, messy and tedious, the results don't lie. It looks freakin fabulous!
Well, there you have it, kiddos, nursery blog numero uno! Still to come, furniture, chandelier, bedding and more!
XOXO,


Love it! You did such a great job!!
ReplyDeleteUmm, this is awesome. And I'm impressed by your patience/attention span... haha I never would have survived!
ReplyDelete